


A square pipe cut sounds simple, but anyone who has fitted a crooked end into a coupling knows how much rework one bad cut can cause. This guide follows a single cut from the first look at the pipe to the final inspection, so you can cut steel pipe square every time with a portable orbital pipe saw. It is written for pipefitters, installers and maintenance crews who cut steel and stainless pipe on site.
We cover setup, support, mounting, cutting technique, inspection and troubleshooting, using the real features of the PipeCut Classics and Pro Series saws. If you are still choosing a machine, browse the full range of portable pipe saws first, then come back to work through the steps below.
Pre-Cut Setup for a Square Pipe Cut
Preparation decides most of the result. This step makes sure the pipe, the saw and the work area are ready before the blade touches metal.
A portable orbital pipe saw cuts by sawing, not by heat. This is cold cutting, so the quality of the cut comes down to the blade, the support and the speed setting. Start by confirming that the pipe is within the saw’s capacity, because it is much easier to catch a mismatch now than halfway through a cut.
| Model | Pipe OD | Max steel wall |
|---|---|---|
| PipeCut 170E | 15 to 170 mm | 8 mm |
| PipeCut 220E | 15 to 220 mm | 8 mm |
| PipeCut 170 Battery | 15 to 170 mm | 5 mm |
| PipeCut 360 Pro Series | 75 to 360 mm | 16 mm (1600 W) or 20 mm (2500 W) |
Wall thickness changes how you set up the cut, and our guide to thin wall versus thick wall pipe cutting explains why. Once you know the pipe fits, work through the setup:
- Mark the cut line on the pipe with a marker or tape so you can see it clearly from the operator position.
- Check the pipe surface. Remove loose scale, heavy rust or dirt along the cut path so the gripping unit and blade meet clean metal.
- Inspect the blade. Look for missing teeth, chips or heavy wear, and replace it if it is not in good condition.
- Check the power. For a corded saw, inspect the cable and plug. For the PipeCut 170 Battery, confirm that a charged 18 V battery is fitted. The package includes two 5.0 Ah batteries and a charger, so you can swap and keep working.
- Clear the area around the pipe so the saw can travel freely and the offcut has somewhere to go.
Before you move on, you should have a marked line, a sound blade, a powered saw and a clear work area.
Supporting the Pipe Before You Cut
A pipe that sags or shifts mid-cut will pinch the blade and pull the cut out of square. This step locks the pipe in place and keeps the weight off the blade.
Place supports on both sides of the cut so neither the pipe nor the offcut can drop or twist as the cut completes. The saws are supplied with supports, and the load figures are worth knowing:
- The PipeCut 170E comes with 4 Pipe Support 170 supports, and the PipeCut 220E with 4 Pipe Support 280 supports. In both cases the load capacity is 314 kg with 4 supports.
- The PipeCut 170 Battery comes with 4 Pipe Support 170 supports, with a load capacity of 190 kg.
- The PipeCut 360 Pro Series package includes 1 double and 2 small pipe supports, with a load capacity of 465 kg with 3 supports.
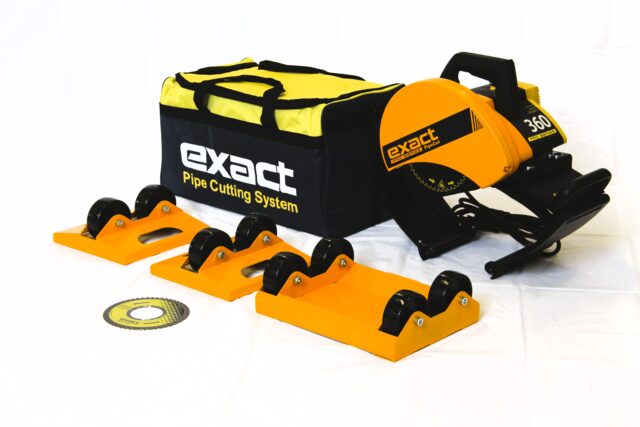
For help matching supports to your pipe size and weight, read our guide on how to choose pipe supports for portable pipe cutting, or browse the pipe supports range.
- Position the supports close to the cut line, one on each side.
- Adjust them so the pipe sits level and steady.
- Press down on the pipe by hand. It should not rock, drop or roll.
When the pipe stays put under hand pressure and the offcut side is held as well, you are ready to mount the saw.
Mounting and Aligning the Saw on the Pipe
This step puts the saw on the pipe at the right angle, which is the biggest single factor in a square result.
- Seat the saw on the pipe with the gripping unit so it sits flush around the circumference.
- Tighten the gripping unit as described in the operating instructions until the saw is held firmly with no rocking or play.
- Line up the blade with your marked cut line. On the PipeCut 360 Pro Series, use the laser indicator to see the cutting point on the pipe and adjust until the laser sits on your line.
- Check the saw by hand. It should sit tight on the pipe without wobbling.

If the saw wobbles or sits off the line, stop and reseat it before going any further.
Choosing the Blade and Cutting Depth
Matching the blade to the material keeps the cut straight and the blade alive longer. This step covers which blade to fit and how to set depth where the machine allows it.
The PipeCut 170E and PipeCut 220E ship with a TCT 140 blade (140 mm, 62 mm bore), and the PipeCut 170 Battery ships with a Cermet THIN 140 blade. The PipeCut 360 Pro Series is fitted with a Cermet 165 blade and accepts 140, 165, 180 and 190 mm blades.
For a deeper comparison of blade types across steel, stainless, aluminium and other materials, see our blade selection guide. When you need a replacement or a different blade, check the blades and discs range.
- Confirm that the fitted blade suits the pipe material and wall thickness.
- Check that the blade is mounted correctly and the fixing is secure.
- On the PipeCut 360 Pro Series, set the cutting depth to suit the wall thickness using the standard blade depth adjustment.
The checkpoint here is simple: the right blade is fitted, it is tight, and on the Pro Series the depth is set for the pipe in front of you.
Setting the Right Speed and Power
The correct speed keeps the blade cutting cleanly instead of rubbing or grabbing, which is vital for a straight, square result.
Speed presets on the PipeCut 170E and 220E
The PipeCut 170E and PipeCut 220E have a no-load speed range of 1600 to 3500 rpm, set through presets:
- Preset 4: stainless and acid-resistant steel
- Preset 5: steel
- Preset 6: all other materials
For plain steel pipe, select preset 5. For stainless, use preset 4. Our guide to the best pipe saw setup for stainless steel and acid-resistant pipe covers that case in more detail. The PipeCut 170 Battery runs at 3500 rpm.
Speeds on the PipeCut 360 Pro Series
The PipeCut 360 Pro Series has two speeds, low at 1900 rpm and high at 2900 rpm, with blade speed preselection so you set the speed before you start. Select the speed that suits the material as described in the operating instructions.

Built-in protection
The PipeCut 170E and 220E have soft start, torque control and an automatic fuse. The PipeCut 360 Pro Series has overload protection, soft start and torque control. Soft start brings the motor up to speed smoothly instead of all at once.
Before you start the cut, confirm that the preset or speed matches the pipe material. That single check prevents many rough cuts.
Cutting Technique for Clean, Square Results
This step is where steady hands and patience produce a square cut. The goal is a smooth, even feed that lets the blade do the cutting.
- Keep your stance stable, with the pipe supported and your body clear of the blade path.
- Switch the saw on and let it reach speed.
- Bring the blade into the pipe along your marked line. Do not push hard to start the cut.
- Feed steadily as the saw travels around the pipe. Keep the feed even rather than pausing and surging.
- Watch the cut line and the saw’s movement. On the PipeCut 360 Pro Series, use the traffic light system, which is there to support cutting precision.
- As the blade completes the final section, ease off the feed and let the saw finish the cut without forcing it.
- Switch off and wait for the blade to stop before removing the saw.
A good cut sounds even and steady, and the saw moves around the pipe without grabbing. If the saw bucks, bogs down or wanders, stop and check the setup before continuing.
Checking Squareness and Finishing the Cut End
Verify a square cut before the pipe goes into a fitting. This step confirms the result and prepares the end for joining.
- Remove the saw and take the offcut away safely. The cut end can be warm from the sawing, so handle it with care.
- Hold a square against the pipe so one edge runs along the pipe and the other against the cut face. The face should sit flush with no visible gap.
- Check the edge for burrs and sharp edges with a gloved hand or a suitable tool.
- Look at the cut face for a clean, even surface with no steps or wavy lines that suggest the saw drifted.
- Deburr the inside and outside edges as your job requires before fit-up.
For a thorough routine before joining, use our pipe end inspection checklist before fit-up. If the face is flush against the square and the edges are clean, the pipe is ready to join.
Troubleshooting Crooked or Rough Cuts
Even with good habits, a cut can come out crooked or rough. Most problems trace back to one of five causes, and each has a quick fix.
- Worn blade: A worn or damaged blade tears the cut, wanders and slows the job. Replace it, and review which blade suits your material. Our technical report on visual analysis of steel chips shows how chip shape reveals blade wear.
- Poor support: If the pipe moves or sags during the cut, the blade pinches and the line drifts. Add or reposition supports close to the cut and recheck that the pipe is level and steady.
- Wrong speed setting: A setting that does not suit the material gives rough faces or a bogged-down saw. On the PipeCut 170E and 220E, use preset 5 for steel or preset 4 for stainless. On the PipeCut 360 Pro Series, reselect the speed to suit the material.
- Forced feed: Pushing the saw faster than the blade can cut leads to a crooked line and extra wear. Back off and let the saw work at its own pace with an even feed.
- Pipe outside the machine’s capacity: Cutting beyond the stated OD or steel wall limit strains the saw and ruins the cut. Check the pipe against the capacity table earlier in this guide and choose a saw that fits.
For more depth, see our guides on troubleshooting pipe saw issues and common pipe cutting mistakes and how to avoid them.
Frequently Asked Questions About Cutting Steel Pipe With a Portable Pipe Saw
How thick a steel wall can a portable pipe saw cut?
It depends on the model. The PipeCut 170E and PipeCut 220E cut up to 8 mm steel wall, and the PipeCut 170 Battery handles 5 mm. The PipeCut 360 Pro Series reaches 16 mm on the 1600 W version and 20 mm on the 2500 W version. Always check the wall against the saw’s rating.
Can a portable pipe saw cut stainless steel pipe?
Yes. The PipeCut 360 Pro Series lists stainless among its materials, and the PipeCut 170E and PipeCut 220E have a dedicated preset 4 for stainless and acid-resistant steel. For setup advice, see our stainless and acid-resistant pipe setup guide.
Which speed setting is right for steel pipe?
On the PipeCut 170E and PipeCut 220E, use preset 5 for steel. Preset 4 is for stainless and acid-resistant steel, and preset 6 covers all other materials. On the PipeCut 360 Pro Series, preselect the low (1900 rpm) or high (2900 rpm) speed to suit the material.
Can the same saw cut both steel and plastic pipe?
Yes. The PipeCut 170E, PipeCut 220E and PipeCut 170 Battery all cut plastic up to a 14 mm wall alongside their steel ratings, and the PipeCut 360 Pro Series handles plastics up to 50 mm. On the 170E and 220E, switch to preset 6, which covers all other materials.
Match the Saw to Your Pipe With Exact Tools
The most reliable square cut starts with the right saw for the job. Our Classics saws cover pipe up to 220 mm OD and 8 mm steel wall, while the PipeCut 360 Pro Series handles up to 360 mm OD and 20 mm steel wall. Pick the machine that fits your pipe, then follow the steps above for a clean, square cut every time.
If you are unsure which machine suits your work, our complete model comparison lays the options side by side, and you can see the full pipe saw range online. You can also compare the individual models: the PipeCut 170E, the PipeCut 220E, the PipeCut 170 Battery and the PipeCut 360 Pro Series.
We are happy to help you choose. Send us your pipe OD, wall thickness, material and site conditions through our contact page, or find a dealer near you through our distributor list.